Tech how-to: Pay with your phone using Apple Wallet
By SleekMart
It houses digital versions of your credit, debit and loyalty cards along with coupons, movie tickets and even lets you redeem rewards. Wallet also pairs with Apple Pay, which allows you to make purchases. Want to learn more about Apple Pay? Tap or click to discover 10 amazing things you can do with it.
Storing payment information in Apple Wallet gives you a convenient way to pay for goods and services. No more digging around your purse or counting cash at the register. A quick swipe of your mobile device at a contactless pay terminal and you’re done. So how do you use it?
Apple Wallet vs. Apple Pay
Before we get into using Apple Wallet, let’s just be clear that Apple Wallet and Apple Pay are completely different apps, though they do work together.
Apple Wallet is a secure, organized folder that stores credit and debit cards, while Apple Pay is the program you use to make purchases in stores, within apps and on the web.
Apple Pay allows you to make purchases anywhere you see these two icons:
You can also send and receive money with Apple Pay using the cards stored in Wallet.
Why add cards to Apple Wallet?
Over the years, banks have improved security measures for debit and credit cards; however, if a thief steals your physical wallet, you still run the risk of that person using your cards before you have a chance to cancel them.
But Wallet utilizes a variety of built-in security features in both your device’s hardware and software to protect your personal information and transactions.
Once you add a new payment (credit or debit) card to Wallet, the data you input is encrypted and sent to Apple’s servers. And when you use your camera to enter the card information, it isn’t saved to your device or photo library. Furthermore, Apple does not store or have access to your card information.
One of the perks that come with Wallet is being able to use Apple Pay, which means you no longer need to type in your payment methods for online purchases or wait for the credit card machines at the grocery store.
What you can store in Apple Wallet
There are many items you can store in Wallet, including:
- Credit and debit cards
- Store coupons/offers
- Loyalty/rewards cards
- Gift cards
- Tickets for concerts/movies/sports events
- Boarding passes
- Student and school faculty IDs (contact your school card office)
Wallet is location-enabled, so if you’re at the airport, your flight number and boarding information will appear first, or if you’re at Walgreens, your coupons will appear first. Payment cards are always displayed in one group and your other items appear in a second group called “passes.”
It’s good to know there are different groups, but how do you add payment cards?
1. Add payment cards
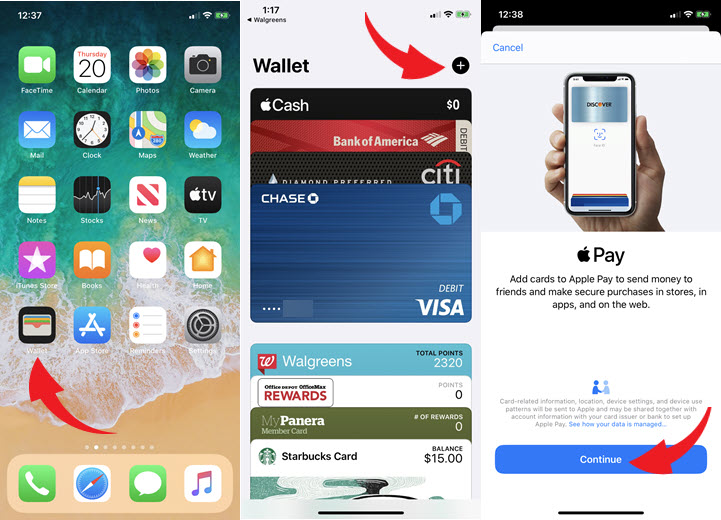
It only takes a few steps to add credit or debit cards to Apple Pay. For iPhones, launch the Wallet app and click the plus sign. Tap Continue and select Credit or Debit Card. You can then add the card either by scanning it with your camera or entering it manually. Follow the on-screen instructions to complete the process.

For an iPad, go to Settings and click Wallet & Apple Pay. Tap Add Card. Follow the on-screen steps and tap Next. To add a card on your Apple Watch, you must open the Watch app on your iPhone and go into My Watch tab. Click Wallet & Apple Pay, then tap Add Card.
To add a card on your Mac, it must have Touch ID. If your model does not have this feature, you will need to complete purchases through Apple Pay on your iPhone or Apple Watch. For Mac with Touch ID, go into System Preferences and select Wallet & Apple Pay. Tap Add Card and follow the steps.
2. Enter everything else
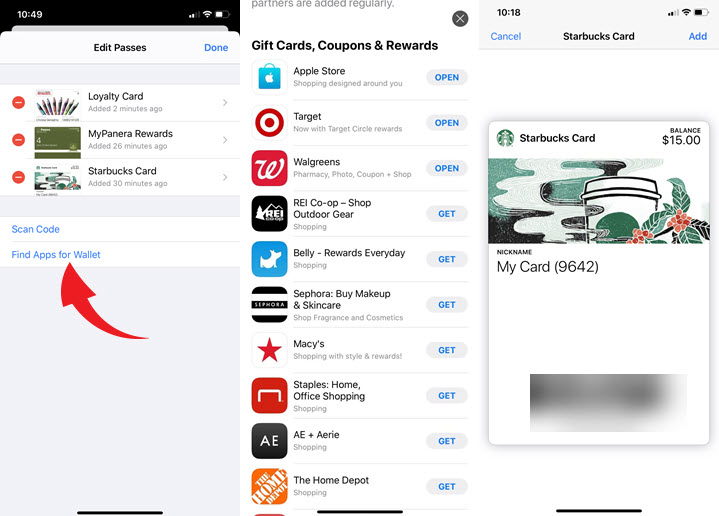
Here’s where you will add your passes such as rewards cards, coupons, gift cards and movie tickets to your iPhone. There are several ways to enter these items. Open the Wallet app and tap Edit Passes. Click Find Apps for Wallet. Open the app and add to Wallet when directed.

Another way to load a pass is to choose Scan Code if you have a physical card or ticket with a QR or barcode. Simply scan the code and your pass will load into Apple Wallet. Other ways to add passes include:
- Through web browsers
- Mail or messages
- AirDrop sharing
- Supported merchant Wallet notification
For Apple Watch, you must either follow instructions in the pass issuer’s email, app or notification (tap Add). For more information on adding passes, visit Apple’s support page.
3. Swipe to pay
When you are ready to pay in-store, simply open your digital wallet and hold your mobile device near the wireless reader near the register. Depending on your security settings, you will need to authorize the transaction with Touch ID, facial ID or passcode.
Not sure what’s the safest way to lock your smartphone? Tap or click to learn if it’s a PIN, facial recognition or fingerprint.
4. Use passes
5. Manage your wallet
Managing your digital wallet is just as important as it is to clean and organize a physical one. So there will be occasions when you may want to rearrange, remove or change a card.
To rearrange either payment cards or passes, press down on whatever card or pass you wish to move and drag it to its new place in the stack.
To remove a payment card or pass, select the item and tap on the three-dot icon in the upper right corner. Scroll down and tap Remove This Card or Remove Pass. If it’s time to clean out more than one of your outdated passes, tap Edit Passes and select the red minus sign next to those you wish to delete.
Once you incorporate Apple Wallet into your shopping habits, it won’t take much to give up its real-life counterpart. Enjoy your new app and rest easy knowing your information is secure.

